
Imagine the sound of a heavy-bottomed cast iron skillet meeting a roaring flame. That initial hiss is the sound of moisture evaporating, paving the way for the complex chemical transformation that defines the best taco seasoned ground beef recipes. It is a sensory ritual that fills your kitchen with a piquant, earthy aroma that signals dinner is finally here.
Most people treat ground beef as a humble utility player, but we are going to treat it like the star of a high-end bistro. To achieve that perfect balance of crumbly texture and juicy infusion, you need more than just a packet of spices; you need a fundamental understanding of how heat interacts with protein and fat. We are moving beyond the gray, boiled-looking meat of school cafeterias.
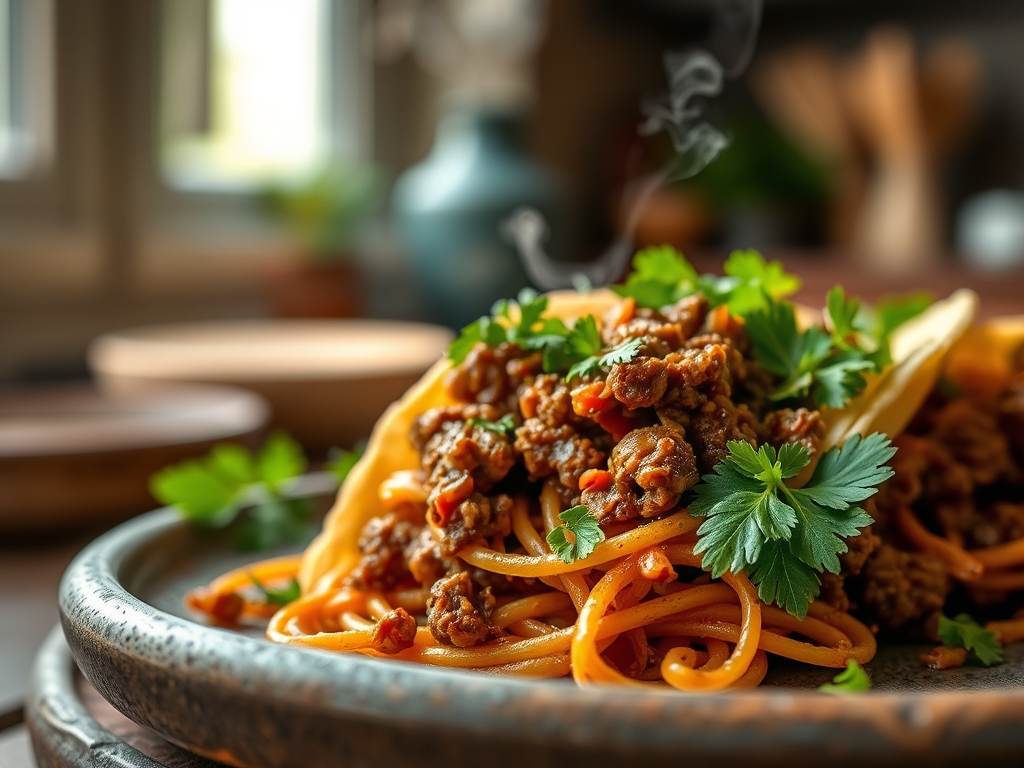
Instead, we are aiming for a deep, mahogany crust and a sauce that clings to every morsel with a viscous, velvety sheen. Whether you are stuffing this into charred tortillas or layering it over a crisp salad, the technique remains the same. It is about precision, patience, and a little bit of culinary swagger. Let us get your mise-en-place ready and transform your Tuesday night routine into a masterclass in flavor extraction.
The Gathers:
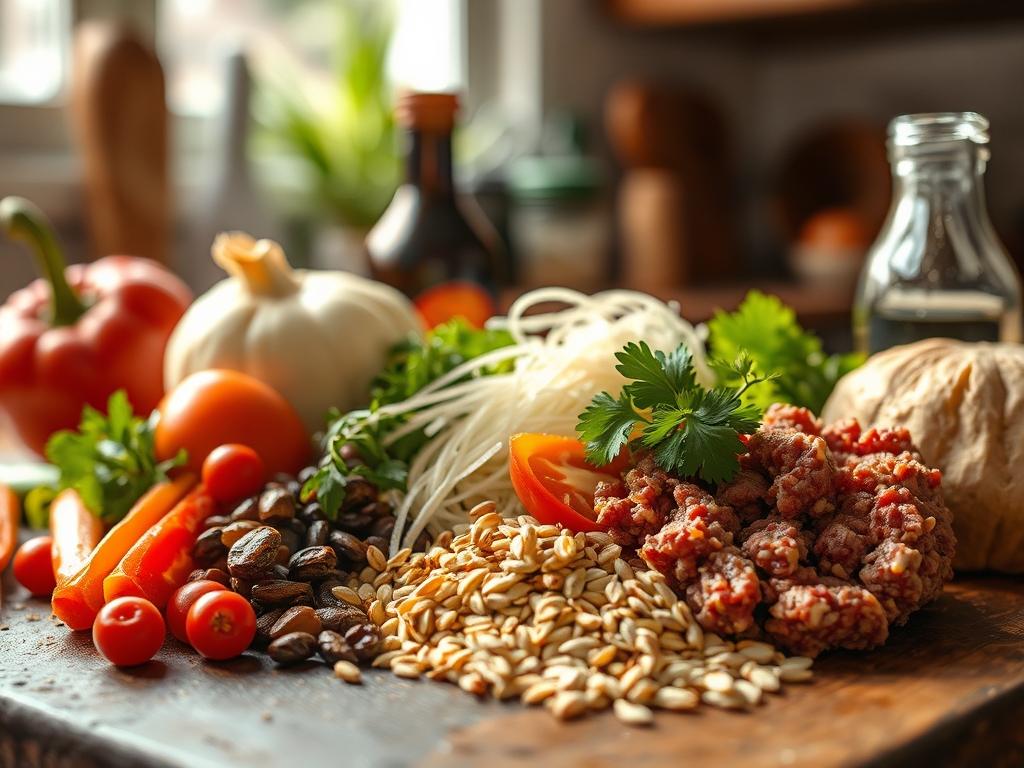
To execute these taco seasoned ground beef recipes with professional flair, your ingredient selection must be intentional. We start with the protein: an 80/20 blend of ground chuck is the gold standard. This ratio provides enough intramuscular fat to render out, creating a natural frying medium for your spices. If you use a leaner 90/10 blend, the meat will often become astringent and dry before the seasoning has a chance to bloom.
Your spice cabinet is your chemistry set. You will need high-quality cumin for its warm, nutty notes; smoked paprika for depth; and ancho chili powder for a mild, fruit-forward heat. Do not reach for the pre-mixed packets that rely on cornstarch and excessive sodium. Instead, gather kosher salt, cracked black pepper, dried oregano, and a touch of garlic powder. To create a truly professional finish, keep a bottle of apple cider vinegar or a fresh lime nearby to provide the necessary acidity to cut through the richness of the fat.
Smart Substitutions:
If you are looking to lighten the profile, ground turkey or chicken can be substituted, though you must add a tablespoon of neutral oil (like avocado oil) to mimic the fat content of beef. For a plant-based alternative, a mix of pulsed walnuts and mushrooms provides the necessary umami and texture. If you find yourself out of chili powder, a small amount of chipotle in adobo sauce offers a concentrated, smoky kick that elevates the entire dish.
The Clock
Efficiency in the kitchen is about maintaining the Chef's Flow. This is the art of sequencing tasks so that no time is wasted and no pan is left unattended for too long. For this recipe, your total active time is approximately 25 minutes.
Prep Time: 10 Minutes. This includes weighing your spices on a digital scale for consistency and finely dicing any aromatics like white onion or jalapeño. Use a sharp chef's knife to ensure clean cuts, which prevents the vegetables from bruising and losing their juices on the cutting board.
Cook Time: 15 Minutes. The first five minutes are dedicated to the sear, followed by three minutes of aromatic infusion, and a final seven minutes of simmering to allow the liquid to reduce and emulsify into a glossy sauce. By adhering to this timeline, you ensure the meat remains tender while the flavors reach their peak intensity.
The Masterclass:
1. The Cold Start and Sear
Place your heavy-bottomed skillet over medium-high heat. Do not crowd the pan. Break the beef into large chunks and let them sit undisturbed for at least three minutes. You are looking for a deep brown crust to form on the bottom of the meat.
Pro Tip: This stage relies on the Maillard Reaction, a chemical reaction between amino acids and reducing sugars that gives browned food its distinctive flavor. If you stir too early, you drop the pan temperature and the meat will steam in its own juices rather than sear.
2. The Rendering and Aeration
Once the initial sear is achieved, use a sturdy metal spatula or a meat masher to break the beef into smaller crumbles. As the fat begins to render, it will liquefy and coat the bottom of the pan.
Pro Tip: Use this rendered fat to sauté your onions and garlic directly with the meat. This process, known as lipid-soluble flavor extraction, allows the fat to absorb the essential oils from the aromatics, distributing the flavor more evenly throughout the dish.
3. Blooming the Spices
Push the meat to the edges of the pan and clear a small circle in the center. Dump your dry spices into this hot "fat pool" and toast them for 30 to 60 seconds until they become incredibly fragrant.
Pro Tip: This is called blooming. Heat awakens the volatile oils within dried spices, significantly increasing their potency. If you simply toss spices into a liquid, they remain muted; toasting them in fat unlocks their full aromatic potential.
4. Deglazing for Depth
Add a splash of beef stock or water to the pan. Use your spatula to scrape up all the brown bits stuck to the bottom of the skillet. These bits, known as fond, contain concentrated flavor that would otherwise be lost.
Pro Tip: Deglazing is a mechanical way to incorporate the results of the Maillard reaction back into the sauce. This creates a more complex, layered flavor profile that mimics the depth of a slow-cooked stew in a fraction of the time.
5. Emulsification and Reduction
Reduce the heat to low and let the liquid simmer. As the water evaporates, the remaining fat and the proteins from the beef will begin to form a viscous sauce. This is the moment to add a teaspoon of tomato paste if you desire a thicker, redder finish.
Pro Tip: This stage involves emulsification. By simmering slowly, you allow the fat and liquid to bind together, creating a sauce that coats the meat rather than puddling at the bottom of the taco shell.
6. The Acid Balance and Resting
Just before removing the pan from the heat, stir in a squeeze of fresh lime juice or a teaspoon of vinegar. Taste and adjust the salt levels. Let the meat rest for three minutes before serving.
Pro Tip: Thermal carryover means the meat will continue to cook slightly after leaving the heat. Resting allows the muscle fibers to relax and reabsorb some of the juices, ensuring every bite is moist and flavorful.
The Deep Dive
From a nutritional perspective, a standard serving of this taco beef provides roughly 22 grams of protein and 15 grams of fat. To optimize this for different lifestyles, consider the following. For Keto enthusiasts, keep the fat content high and serve over shredded cabbage. For Vegan adaptations, use lentils or soy crumbles and add a dash of liquid smoke to replicate the beefy depth. Those following a Gluten-Free diet should ensure their spices are not processed with wheat-based anti-caking agents.
The Fix-It: Common Pitfalls
- The Meat is Greasy: If there is too much liquid fat, tilt the pan and use a spoon to remove the excess, but leave about a tablespoon for flavor.
- The Meat is Tough: You likely cooked it too long on high heat. Add a tablespoon of water and cover the pan for two minutes to rehydrate the proteins.
- The Flavor is Flat: This usually means a lack of acidity. Add more lime juice or a pinch of sugar to brighten the earthy spices.
Meal Prep Science:
When reheating, do not use the microwave on high power, as this toughens the protein. Instead, place the beef in a saucier with a tablespoon of water over medium-low heat. This gentle steam recreates the original emulsion, ensuring your "day-two" tacos are just as succulent as the first night.
The Wrap-Up
Mastering taco seasoned ground beef recipes is about more than just following a list of steps; it is about respecting the ingredients and the physics of the pan. By focusing on the sear, blooming your spices, and balancing your acids, you elevate a simple weeknight meal into a culinary event. Now, grab your tongs, fire up that skillet, and show your kitchen who is boss. Your best tacos are only fifteen minutes away!
The Kitchen Table
How do I make my taco meat less grainy?
Ensure you are using 80/20 beef and do not over-brown it. Adding a small amount of liquid, like beef stock, and simmering it at the end helps create a smoother, more cohesive texture.
Can I freeze taco seasoned ground beef?
Yes, it freezes beautifully. Let the meat cool completely before transferring it to a vacuum-sealed bag. It will maintain its quality for up to three months; simply thaw in the fridge overnight before reheating.
What is the best way to drain excess fat?
Carefully tilt the skillet and use a large spoon to ladel out the grease into a heat-safe container. Avoid pouring it down the sink, as it will solidify and cause plumbing blockages.
Why does my homemade seasoning taste different than packets?
Store-bought packets contain thickeners like cornstarch and high levels of sodium and sugar. Your homemade version is purer, focusing on the actual oils of the spices rather than artificial fillers.
Should I wash the meat before cooking?
No, never wash raw meat. It does not remove bacteria and significantly increases the risk of cross-contamination in your kitchen. High heat during the searing process is what kills any pathogens.